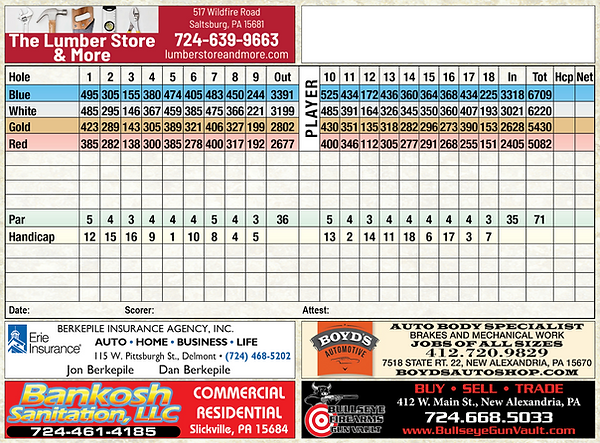
Course Layout & Scorecard
The Front 9
Hole #1 Par 5
A straight par 5 to start the round. Woods run the full length of the hole on the right, so accuracy off the tee matters. A pond with cattails sits in front of the green, taking the ground option away on the approach. Tall pines to the left of the green limit recovery shots from that side. The green is long and slightly slopes from back to front.
Yardages:
-
Blue: 495 yards
-
White: 485 yards
-
Gold: 423 yards
-
Red: 385 yards

Hole #3 Par 3
A short, downhill par three that offers a scoring opportunity. Bunkers line both the left and right sides of the green, while missing right or going long brings the woods into play. The green is fairly flat with subtle undulation, putting a premium on solid contact and distance control.
Yardages:
-
Blue: 155 yards
-
White: 146 yards
-
Gold: 143 yards
-
Red: 138 yards

Hole #2 Par 4
A short dogleg left that puts the decision on the tee. Trees on the left block a straight shot to the green, so the preferred play is a controlled draw around the corner. Woods line portions of the right side, and a tee shot hit too straight can run through the fairway. The green sits on a mound and slopes away from the player, with a steep front edge and bunkers guarding the left, making approach distance and trajectory important.
Yardages:
-
Blue: 305 yards
-
White: 295 yards
-
Gold: 143 yards
-
Red: 138 yards

Hole #4 Par 4
A steep uphill par four. The fairway slopes toward the woods that run along the right side, so keeping the ball left off the tee is the safer play. After the first 50 yards, the left side opens up and provides plenty of room. The green is narrow and slopes hard from back to front and to the right, making approach distance control important. Shots that go long will find the woods.
Yardages:
-
Blue: 380 yards
-
White: 367 yards
-
Gold: 305 yards
-
Red: 300 yards

Hole #5 Par 4
A long, downhill par four that requires two solid shots. A fairway bunker sits in the primary landing area for drivers, forcing a decision off the tee. The green slopes directly from back to front, and going long leaves a difficult, blind chip back toward the putting surface. Bunkers protect the right side of the green, while overhanging tree branches limit approaches and recovery shots from the left.
Yardages:
-
Blue: 474 yards
-
White: 459 yards
-
Gold: 389 yards
-
Red: 385 yards

Hole #7 Par 5
A challenging par five that rewards a well-placed tee shot. The fairway rises to a crest and then narrows as it funnels downhill toward the green. Depending on distance off the tee, the second shot may be blind. Reaching the top of the hill leaves a downhill approach into an undulating green, with a steep drop-off if you miss left. Woods line both sides of the hole, and misses in either direction on the tee shot or approach are costly.
Yardages:
-
Blue: 483 yards
-
White: 475 yards
-
Gold: 406 yards
-
Red: 400 yards

Hole #6 Par 4
A slightly uphill par four. Tree trouble on the right is minimal, but the left side demands attention, with out-of-bounds along the road and pine trees that make recovery unlikely. The green is slightly tiered and slopes from back to front. A deep bunker guards the left side of the green, and shots that go long will find the fescue.
Yardages:
-
Blue: 405 yards
-
White: 385 yards
-
Gold: 321 yards
-
Red: 278 yards

Hole #8 Par 4
A long, straight par four that demands accuracy off the tee. The road along the left side is out of bounds, while a sharp drop-off guards the right, making placement critical. A bunker protects the left side of the green, which is steeply two-tiered and slopes from back to front, putting a premium on approach distance control.
Yardages:
-
Blue: 450 yards
-
White: 366 yards
-
Gold: 327 yards
-
Red: 317 yards

Hole #9 Par 3
A long par three that requires a strong tee shot to have a realistic birdie chance. The left side is out of bounds, while misses to the right will generally find fescue, though that side opens up closer to the green. Two bunkers guard the right side of the putting surface, adding pressure on approaches that leak in that direction.
Yardages:
-
Blue: 244 yards
-
White: 221 yards
-
Gold: 199 yards
-
Red: 192 yards

The Back 9
Hole #10 Par 5
An uphill par five that calls for a straight tee shot framed by pines. Longer hitters can reach the green in two, but the approach is generally blind. A central bunker short of the green punishes anything left short, while a bunker to the right catches shots pushed in that direction. Long brings fescue into play, while the left side is more forgiving. The green slopes from back to front.
Yardages:
-
Blue: 525 yards
-
White: 485 yards
-
Gold: 430 yards
-
Red: 400 yards

Hole #12 Par 3
A short par three that plays straight downhill. A creek with cattails guards the front of the green, while the road runs long. A bunker protects the left side and tree trouble waits to the right. The green slopes from back to front, and a well-struck tee shot gives a good scoring opportunity.
Yardages:
-
Blue: 172 yards
-
White: 164 yards
-
Gold: 135 yards
-
Red: 112 yards

Hole #11
A very challenging par four that demands precision off the tee. The drive crests over a hill and must be placed on the right side of the fairway. Miss too far right and you’re in the woods; play it down the center and the ball can run into the trees on the left; anything pulled left off the tee is out of play. The approach is uphill over a pond to a green set on a steep slope, with shots coming up short heavily penalized. There is very little room to miss on this green in any direction.
Yardages:
-
Blue: 434 yards
-
White: 391 yards
-
Gold: 351 yards
-
Red: 346 yards

Hole #13 Par 4
A dogleg left that rewards a well-shaped tee shot. Cutting the corner on the left offers the best angle, but a pond sits at the bend and brings risk into play. The approach is to a green protected by a large pond in front. Shots hit too straight off the tee or pushed right on the approach can run through the fairway toward a fence. Long is no help either, with a steep drop-off behind the green and trees that make recovery difficult. The green slopes from right to left.
Yardages:
-
Blue: 436 yards
-
White: 326 yards
-
Gold: 318 yards
-
Red: 305 yards

Hole #14 Par 4
A dead-straight par four that rewards a solid, accurate drive. The horse ranch along the right side is out of bounds, marked by a fence, so keeping the ball in play is important. A good tee shot sets up a straightforward wedge approach. The green slopes from front to back and slightly to the left, making distance control on the approach key.
Yardages:
-
Blue: 360 yards
-
White: 345 yards
-
Gold: 282 yards
-
Red: 277 yards

Hole #16 Par 4
An almost drivable par four with a good tee shot. The preferred line is down the left side of the fairway, as the fairway slopes hard to the right toward the woods. A fairway bunker sits on the left just past the 150-yard mark, with fescue guarding that side as well. The green is fairly open, setting up a simple approach for those who find the right position off the tee.
Yardages:
-
Blue: 368 yards
-
White: 360 yards
-
Gold: 273 yards
-
Red: 268 yards

Hole #15 Par 4
A slight dogleg left lined with trees down the left side, rewarding a gentle draw off the tee. Shots pushed too far right will find the woods. The approach plays into a green guarded closely in front by a pond with cattails, requiring a precise approach shot to carry the hazard and hold the green.
Yardages:
-
Blue: 364 yards
-
White: 350 yards
-
Gold: 296 yards
-
Red: 291 yards

Hole #17 Par 4
A straightaway par four with a fairway that slopes from left to right and plays fairly wide off the tee. The main danger is right, where a miss can run out of bounds across the road. The green is surrounded by pine trees and features two distinct tiers, sloping firmly from back to front, making approach distance and downhill putts challenging.
Yardages:
-
Blue: 434 yards
-
White: 407 yards
-
Gold: 390 yards
-
Red: 255 yards

Hole #18
A solid, slightly uphill par three that plays over a short stretch of woods. Bunkers guard both the front left and front right of the green. The back portion of the green is relatively flat, while the front slopes sharply away, making it difficult at times to hold approaches that come up short.
Yardages:
-
Blue: 225 yards
-
White: 193 yards
-
Gold: 153 yards
-
Red: 151 yards